
I love to DIY and I normally have numerous projects going on at once, which my husband absolutely hates because he is a ‘one tasker’ – you know the type, you could well be one too, complete one project before moving on to the next. Not me. I’m not sure why it is but I’ve always been like that. I get bored doing one thing or waiting for it to finish or have to stop because of budgetary constraints, so I move on to the next thing whilst biding my time.
Currently on my project lists I have the master bathroom project (which has come to a grinding halt until hubby takes some time off later in the month and we replace the counter top and sinks etc). I have also begun with our main floor stair makeover (you can see pics of that in a later blog), I have one painting I’m in the midst of (yes, I’m trying to establish myself as an artist as well, with a store on Etsy, though that now needs to be updated as my paintings have all expired, so I’ll add that to my current projects (here’s the link to it: Le Shez Boutique). Back to the painting; it has me a little vexed as to where to go with it to improve it, so it’s been benched at this point in time. Finally, I have the project that this blog is about: my side table makeover.

We’ve had this table since we lived in Italy, it wasn’t a cheap purchase but it certainly isn’t of the quality that furniture used to be made of either. It has a veneer coating and has certainly travelled well, having moved with us into nine different houses, including two overseas moves! I’ve always liked the design but the large chips in it and the differing tastes in both houses and changes in tastes in myself, mean I also now find it outdated and ugly with potential.
One other thing I always do is keep an eye out for bargains that may come in handy at some point in time for some particular project I know I will do in the future, or for a project I didn’t even know I wanted to do just yet, and that’s exactly how I came across this chalk paint. LIDL (a German store that rivals ALDI) has so many of these bargain things that sometimes I have to say no to shopping there! But when I saw the below pictured chalk paint for about $5, I knew exactly where I could use it! So onto table restoration I went (in between waiting for coats to dry on said staircase).

The first thing I had to do was obviously dust it off and remove the handles. If you want to paint them (the handles), spray paint is probably your best option, but I chose not to in this case thinking they were in great condition as is. I then gave the table a very light sanding. I used 220 grit sandpaper. You have to be very careful when sanding veneer that you do not go too deep with your sanding. After I had lightly sanded everywhere, it was on to filling in the accidental scratches and divets that were not helping this table age gracefully! I used MINWAX Stainable Wood Filler, for no other reason than that it was the one that looked easiest to use and was a good price in the store. I needed something that I could paint and stain (for my piano project that will happen one day) and something that could be sanded – this was perfect. I filled the scratches, waited for the filler to dry then sanded it down once more. I also grabbed something I could get all the grime out of the cracks with, the fact that it happened to be a stem from an edible fruit arrangement received sometime over the past 10 years did not go unnoticed by me, but you know that’s why I keep this crap around! You never know when something like that will come in handy!


I cleaned the table once more with damp paper towel then began the process of painting it. I wasn’t too fussed about it looking perfect after the first coat, given I knew it would require at least two coats of my base color.
First coat:
Second Coat (the paint is still drying in this photo):
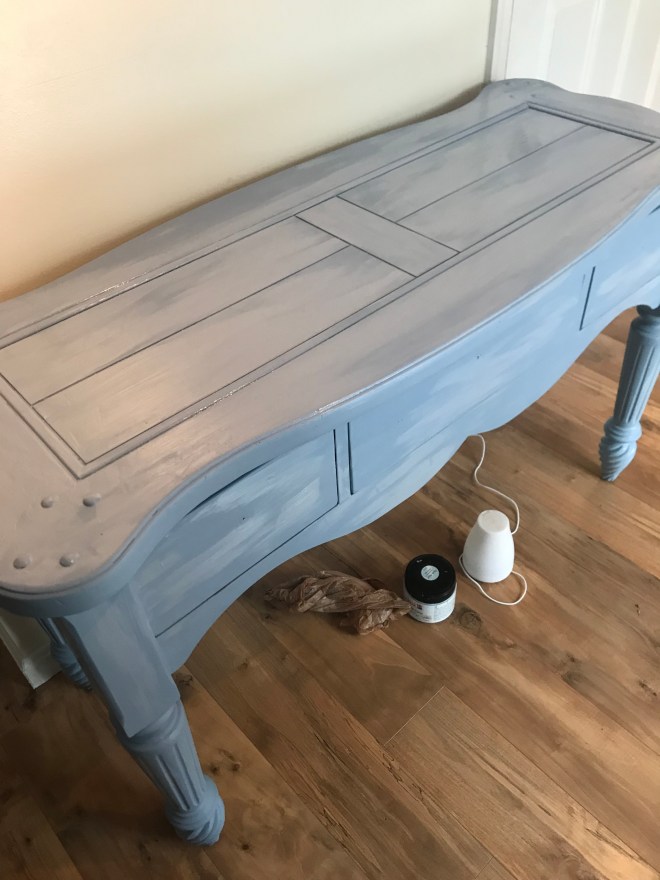

Now it was a matter of what to do next. I wasn’t actually using chalk paint for the next part, I had leftover ceiling paint (flat white) and thought it would be perfect for the effect I wanted. I grabbed both a thin brush as well as a foam brush and dipped into the ceiling paint and tried to focus on the detailed areas that I wanted highlighted in the white paint – the grooves etc. I had a wet paper towel on hand to get rid of/blend anything I wasn’t totally happy with, chalk paint is quite forgiving as long as you don’t press too hard. It was really a matter of going until I was happy with the results. If I wasn’t happy, I’d grab the brush for the chalk paint and paint over whatever it was I wasn’t happy with.


I had some Rustoleum Cabinet Transformations Protective Top Coat leftover from our kitchen renovation in Colorado, so I used this to seal the chalk pain in, The whole process literally took less than 7 hours. I’m happy with the results. Hubby and eldest daughter absolutely love it (and were completely surprised because they had no idea this project was on the agenda). Middle daughter isn’t a huge fan, youngest (son) loves it! So I guess a 4/5 isn’t bad right! I hope you’ve enjoyed it too!


If you’ve enjoyed this blog, please share it with your friends and go ahead and like my Facebook page: Aussie Mum’s Adventures. I’m on Twitter: @Ozmumsadventures and you can find me on Youtube also: Aussie Mum’s Adventures, though I’ve got a tonne of videos not yet posted that need to be edited and uploaded and no one to do that for me! LOL.

