COVID-19 Moderna vaccination / Covid Arm side effect and my experience.

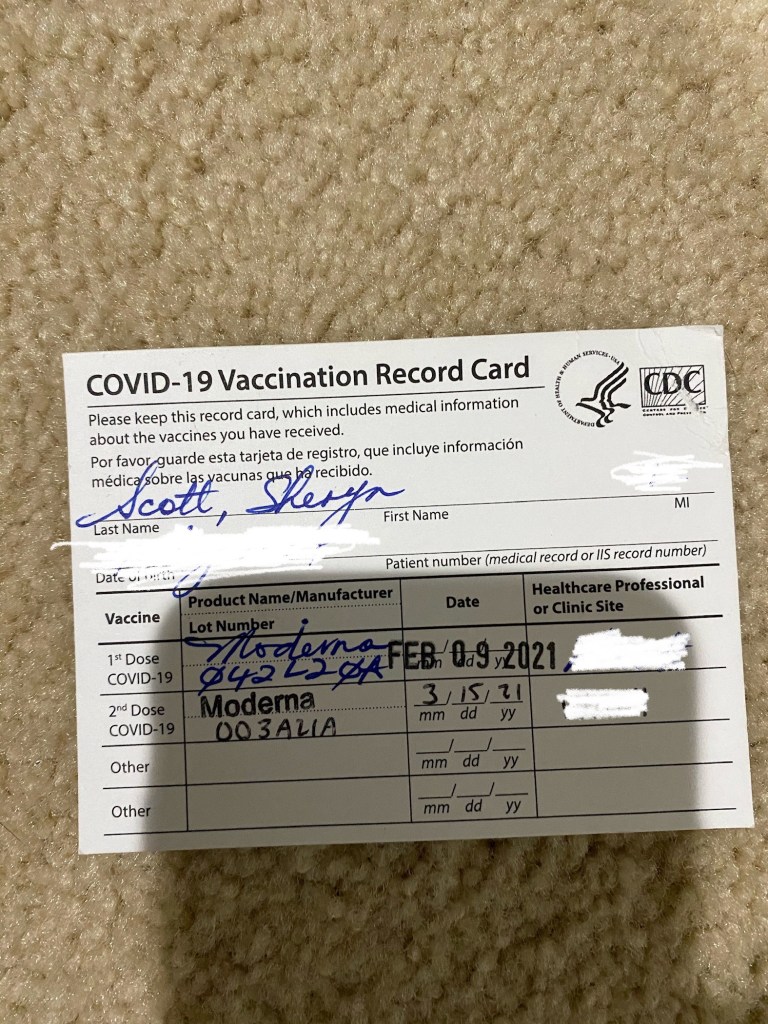
Much to my family’s (and my own) surprise, I got the first dose of the Moderna vaccine on February 9, 2021. It was an interesting transpiration of events.

At the time, my husband was working nights and had just gone to bed when my phone rang at about 8:30am in the morning with an automated message saying I was now eligible to get the vaccine. It was all completely unexpected as I am not anywhere near the 65plus mark, nor did I think I had any immune compromising preconditions, but apparently the Army system had asked all those eligible in order, and those ahead of me had either gotten the vaccine or had refused it. They needed to get the shots they had on hand out to not only those eligible, but to those who actually wanted it.

Hubby and I had had a conversation just the afternoon before discussing whether or not I would get my shot and I had honestly told him that I wasn’t sure. I had reservations, but I also desperately need to get home (to Australia) and will do anything I can to not have to pay thousands of dollars out of pocket to mandatory quarantine at designated hotels upon arrival. Yes, thousands. This after having paid the hefty price just to get there and with a family of five, this is indeed a hefty amount. I digress.

Anyway, On that February morning, I found myself pushing the button to be connected to someone if I would like to schedule an appointment. Before I knew it, I was booked in for midday that same day!

Well, off I went, not really thinking about what I was doing at the end of that 40 minute drive. The entire process took about an hour. I had to drive in to a field and fill out my paperwork as I passed designated soldiers to direct me where to go next. It was quite well organized given the number of cars both in front of and behind me. Eventually we pulled into designated parking spaces and went inside an auditorium to physically have our shots. We had to spend 15 minutes afterwards to make sure there were no immediate adverse effects, then it was off home.

My arm began to ache about 2 hours after getting my shot and was reasonably sore when I went to bed that night. I awoke with pain if I rolled on it, so it certainly wasn’t a fun night’s sleep. The next morning at about 11am, I started getting chills and just feeling generally rubbish. I really couldn’t move from my couch, even getting my friend to send our son home from the bus stop by himself because I just couldn’t get up. It was a rough 24 hours! But when it was done, I felt great. My arm was no longer sore, I didn’t have a fever, in fact all was good!

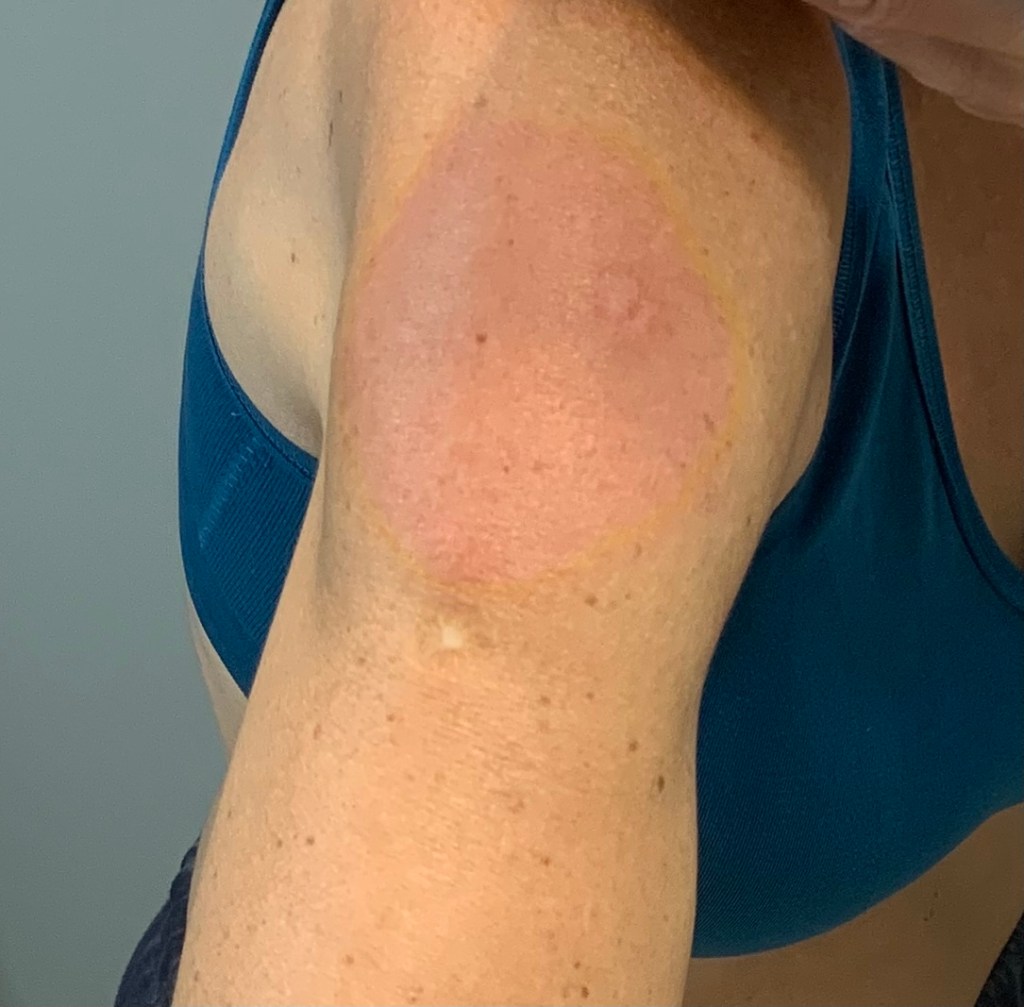
On February 15, 6 days after getting my first Covid shot, my left arm (the arm I got jabbed in) started to really throb again, It was about 6pm at night. Then it got incredibly itchy but it was too painful to touch. I took some Benadryl and some ibuprofen thinking this was a local allergic reaction, another rough night lay ahead! When I awoke the next morning, my arm was incredibly tender. I had a large, raised red lesion measuring about 10cm in diameter. It was burning hot to touch, itchy as hell and so sore that when I did try to itch it, it hurt like crazy! I really wasn’t sure what was happening, so talked to my doctor (who happened to call me about something else on that day) who told me it was just a secondary reaction and not to worry. “Take Benadryl and ibuprofen for the discomfort and it will go away shortly”. So I didn’t stress too much until my friend saw it at the bus stop and was very concerned that I had an infection (cellulitis). We were about to go to Disney World (first time ever after finally getting the go ahead from the head boss at hubby’s work because he had been fully vaccinated). Nothing was going to stop me! So I read and I read until I finally found an article on something called ‘Covid Arm’. The link to it is here.

That almost described my symptoms to a T! So that’s what it was; Covid Arm. A little known side effect (at that time) that seems to affect women more so than men for some reason.

This was on the night when the lesion first started coming up

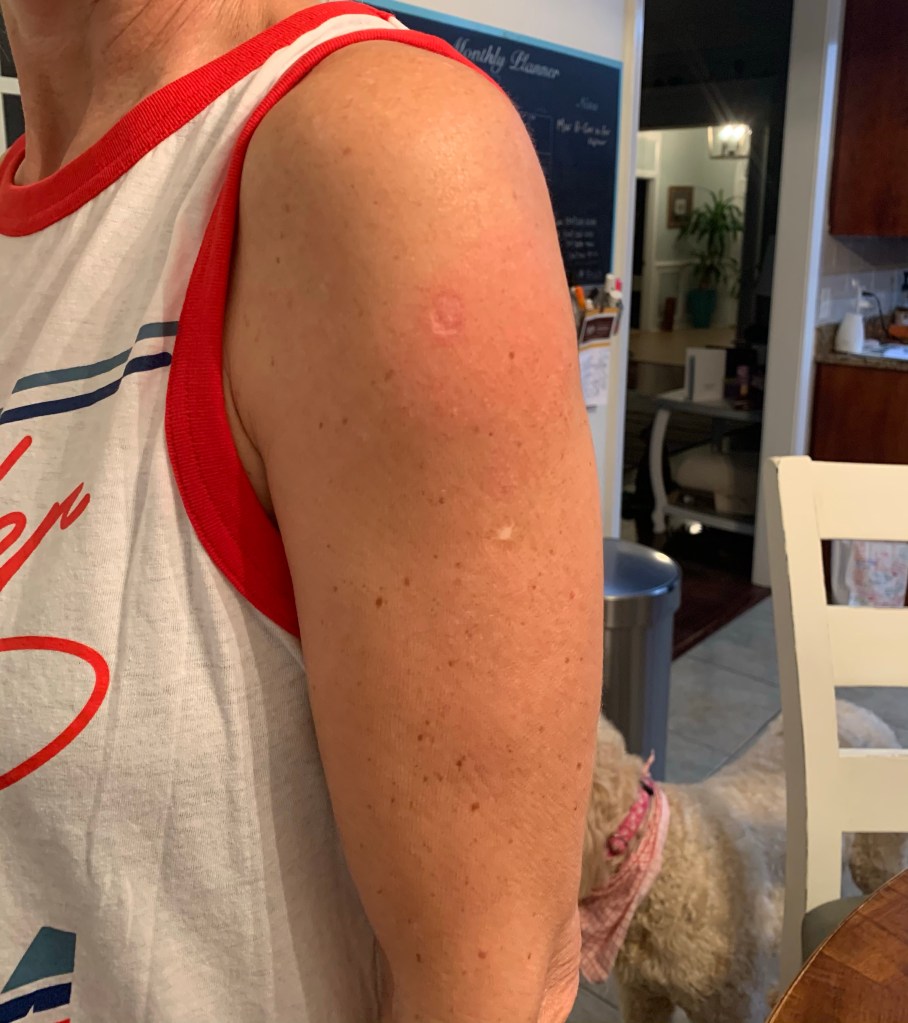
My Covid Arm lasted for approximately 8 days. It was extremely uncomfortable but by the end of our 4 days at Disney, I could at least go on rides and not be in agony as well as terrified! Lol

By the time I got my second shot (March 15) my left arm had finally started feeling almost normal (though even as I write this segment of the blog – day 2 of second shot – it still has some tingles).

No your eyes aren’t deceiving you, there is actually a yellow line we drew around the outside over the top of the red line that naturally surrounded it (I was concerned about cellulitis at the time).
Disney was fantastic! Even with a sore arm 😊

Ok, on to shot number 2 of the Moderna vaccine. One thing I didn’t do this time was massage my arm after the shot or exercise it at all, whereas the first time, I really made sure to move it constantly & I’m pretty sure I paid for it with a very sore, heavy arm from the get go. Even though I took a Benadryl that first night, I didn’t sleep at all, I would roll on my arm and have to prevent myself from screaming in agony and waking my husband, it was dreadful! So I spent my entire day 2 in bed, drifting in and out of sleep, feeling like my whole body was aching. I wouldn’t say I had a fever as such, just a weird feeling like butterflies in my stomach but spread throughout my body. Everything ached, particularly everything on my right hand side (I got the shot in my right arm this time as per the articles I had read about Covid arm and their recommendations). But even my lymph node behind my right ear was swollen. It was weird. I felt sick but didn’t vomit. I just tried to drink lots of water and get beyond that crappy feeling. I took an ambien sleeping tablet that night just so I could get some decent sleep having had none the previous night (yes, I have a prescription as I suffer from severe insomnia- but try to only take them one or two times a week).

Day 3. Woke up and got kids off to school, but went back to bed after everyone left, yes, I am lucky enough that I could do that, some of you don’t have that ability and I’m sorry, all I can say is better one or two days with side effects from the Covid vaccine than one or two weeks (if not longer) if you actually get COVID.

I say all this because I started feeling better by lunchtime day 3. Yes, I’ve had a reaction and I’m literally trying to give you the facts, not trying to convince you yay or nay. That’s completely up to you! But once again, I digress before the story is fully done. Day 3. By lunchtime I think my mind overcame my body as there were things I had to do (literally tornado warnings/watches next day as well as goods to prepare for my first spring market on March 20, 2021)! Exciting times!

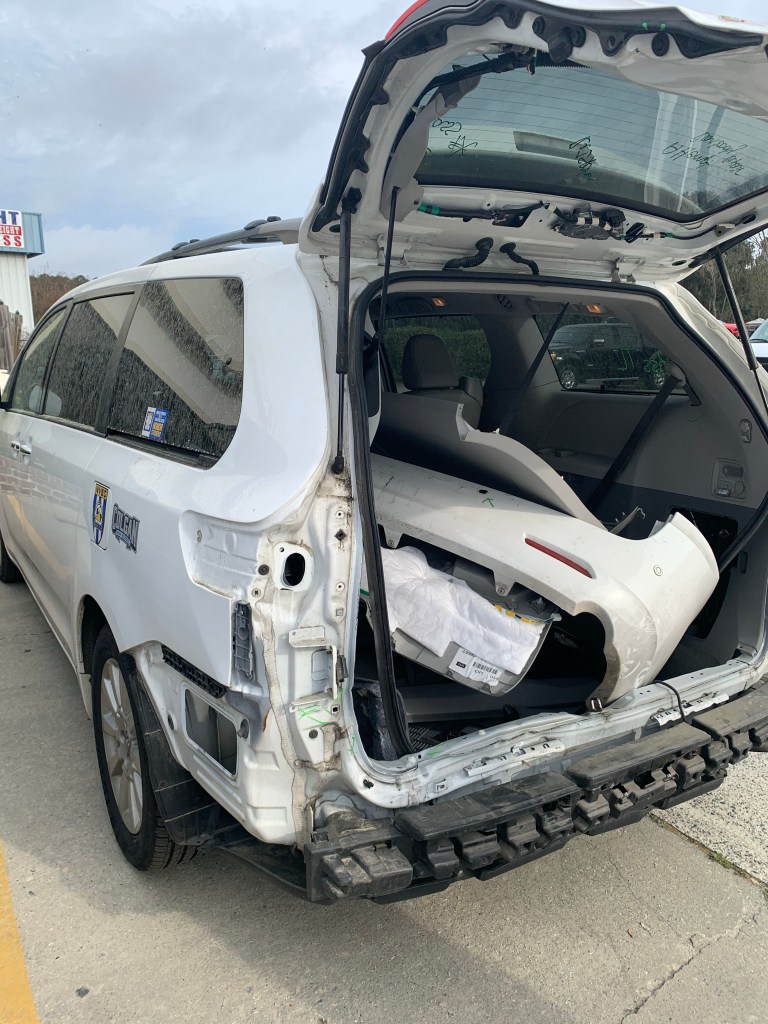
Oh and my car just got written off after what we thought of as a somewhat small accident! NOT prepared for that! But we are all alive and well, so that’s all that matters.

The minivan got rear ended by a big, old truck and the insurance company wrote it off because there was frame damage! A new car wasn’t in the plans, but it’s exciting nonetheless!

Anyway, tomorrow we will deal with tomorrow’s challenges! Back to the now (or the then) my COVID arm seemed to be make an early appearance (last time it took 6 days, second shot was only 3 days) and it disappeared just as quickly as it came with nowhere near the same size lesion or pain levels!

Covid arm stayed with me for 3 days only this time and I am now 21 days past my second shot and doing great!

My left arm is still a teensy bit tender, my right arm though, is great!

I’m all about freedom of choice and I hope this helps you to be informed and make the right decision for you!

If you enjoyed this read, please subscribe to my blog or find me on Facebook Aussie Mum’s Adventures

Little Shop of Horrors Halloween Treasure

So, we happened to be in Michael’s a few weeks ago and I saw this really cute (but pricey) Venus fly trap. Rather than pay the $100 price tag for this cute Halloween prop, I thought I’d make it! Turned out fairly easy too and quite the neighborhood talking point and centerpiece.

What you’ll need:

  • Foam Pumpkin
  • Hot knife
  • Fake Sunflower stems (or something even stronger)
  • Dollar store leaves/mini pumpkin leaves
  • Hot glue gun/glue sticks
  • Pot to use as the base
  • Cardboard
  • Something to weigh the pot down
  • Acrylic paint (shades of green and red)

I had a lot of the stuff I required for this project already, so the only items I really needed were the foam pumpkin, the sunflower stems and the greenery/mini pumpkins with leaves that I found at my local dollar store.

I did pick up a small pumpkin from the dollar store as well so I could have a practice run on carving one out as I had never used a hot knife and I had never carved a foam pumpkin before. It’s a really good idea to do a practice run as it does smell (a lot) so you definitely need to be outside or somewhere you can get some fresh air and using a hot knife is very different to using a box cutter.

Foam pumpkin

I grabbed my pencil and drew out what I wanted the “smile” to look like and it was only as I was drawing that I thought I could actually carve the teeth out of the pumpkin as well! So I drew those on there and made sure I was happy with where everything aligned itself. Definitely don’t cut until it looks good! I also thought that the end of the pumpkin with the stem on it actually looked better than the end without, so I cut my stem off and later glued (and screwed) it on to the other end.

I’d already inserted the sunflower stem by the time I took a photo

As you can see in that last photo, I used the hot knife in a sidewards motion to scrape/melt/cut the “pumpkin” skin off the side of the teeth and found their off-white look was absolutely perfect for the look I was going for. Be really careful doing this part though, it comes off easier than you think it will and I may have come dangerously close to cutting/burning myself!

Be careful your hot knife doesn’t melt too much of your pumpkin

It was at this juncture I realized I needed to take a little more “skin” off from where the stem had been and use my glue gun to give her some lips. This was fun as it just came down to imagination and self-appeasement, the only problem I had was a lack of patience waiting for the glue to dry in between layers. I did end up doing three different layers of glue before I was happy with it.

Glue lips taking shape

Then it was on to the painting. The first thing I did was pour red paint inside the “mouth” and use a long paint brush to delicately push it around the entire inside of the mouth. This took some patience as it was on very thickly (to be able to swirl it around inside without damaging any of the teeth on the outside) and took forever to dry! I used two different shades of green (just from Walmart’s cheap acrylic paint selections & painted until I was happy. Each side of the pumpkin took 2 coats followed by some touches up. The lips were painted after the green was dry and that’s where I had to do some touching up around the edges.

Finally she started looking like the one I had modeled her off!

The original

After I was happy with the painting side of it, I put a hole in the original stem for the sunflower stems to go through and glued it on to the other side of her, but as I said earlier, I found the glue wasn’t quite strong enough so I ended up finding a screw and screwing the stem down. Now it was a matter of getting her to be able to stand on her own and look like she was a little more polished. I used both sunflower stems but actually found these weren’t strong enough on their own so had to get some floral wire and wrap it around the stems, reinforcing them a little bit. I put the stems in a black pot I already owned and used a couple of bricks/stones to hold them in place. In the meantime I had traced a hole (using the pot as my frame) from a piece of cardboard (one of our thicker moving boxes) and used it to cover everything in the pot. I wanted this to sit in there nicely and securely so it was really a matter of cutting little tiny slits all around the edge of the original circle to make it squeeze inside the pot perfectly.

I wrapped the dollar store leaves/mini pumpkins and even the practice pumpkin all with the green floral wire and attached it to my two sunflower stems then poked a hole through the cardboard. I actually ended up attaching the whole thing to my mailbox as the stems still weren’t strong enough to stay up on their own even with the floral wire, so my suggestion would be to find something a little thicker and a little stronger if you want this to be a standalone item. I’m going to cross that bridge next year when I have some more time to invest in making this a standalone item. For now though, I think it came out great! And it cost me less than $20!

I have a magnolia tree and used the cones from it that were lying in my yard to cover the cardboard. You could use pine cones or anything you have to do the same.
The “baby”. 😆

Let me know what you think and if you’ve got any suggestions for keeping it upright on its own or you’d like to share your photos when you make this yourself.

If you enjoy reading my crazy, varied blogs, please subscribe here on WordPress. Sharing is caring, so feel free to share with your friends. I’m on Facebook: Aussie Mum’s Adventures. Come like my page and share it with your friends! You can find me on Twitter: @ozmumsadventures, on Instagram: Ozmumsadventures, and on Pinterest: Aussiemumsadventures

The Unforeseen

I had planned for everything. Everything! Well I thought I had anyway. Who the hell plans for a global pandemic? Aside from those weirdo doomsday preppers that we all watched on U.S. tv and thought of as a bunch of crazies!

I had spent my entire life working my arse off to get where I am. People gave me a lot of shit over the years because my parents were wealthy, what they didn’t know was that aside from a minimal startup amount, they never gave me anything. I was expected to do it all on my own. When I entered the same business arena as my father, I thought I would at least get some connections, but no, nothing. So I had tried. Tried and failed unfortunately. But I was never one to give up. I wanted to own property. I wanted wealth in my own right! So I worked and I worked, odd jobs here and there. I worked in telemarketing, I stocked supermarket shelves, I picked fruit and vegetables during the seasons, I worked on a small, local public radio station as a DJ for a time, I waited, bar kept and eventually managed a restaurant until I knew I had to move on. Acting was my real passion and I got a few gigs here and there, I even managed to be a regular in a small-time theatre production, but the money wasn’t good & there was little notoriety with it & at the end of the day, I really craved some fame and some fortune!

But now that could all come to an end! I had a couple of great apartments on the beach, both were my Air BnB cash cows, but the ‘rona shutdown meant everyone had canceled or been forced to cancel. The world had come to a standstill. Except the bloody banks hadn’t jumped on that bandwagon! They still expected my mortgage payment every week! I had asked, even begged, for them to give me a break, but my local bank manager had just nodded his agreement to the times are tough argument and said my letter had gone to the higher-ups and it was out of his hands now! That was three weeks ago and I only had a couple more mortgage payments in me. Years and years of hard work and sacrifice on the precipice of being for nothing! What the hell was I going to do? I know I’m not alone, there are others in the same boat, but I’m a single woman, without anyone to turn to to ask for help! I have been out stocking supermarket shelves during the ‘rona, I have applied for job after job! I’ve applied for jobs I’m not qualified for and jobs I am way over-qualified for, but now it’s down to the wire. There is no happy ending in sight. The ‘rona won’t kill me directly, but it’s looking like it will be the end of me!

Lost Love – a short story

Little did she know how events would change. She had approached this with optimism, a chance to renew, rekindle, reconnect. Their relationship had been rocky for the last few months. She couldn’t pinpoint the day it started, but she remembered waking one morning and staring into his sleeping face and feeling nothing. It wasn’t even that she didn’t like him, she just didn’t feel. How did it get like this? She asked herself. We were once so in love.

When quarantine, or self-isolation as those who liked to put a positive spin on things called it, came into effect, she thought this would be their chance. They had no children, they only had each other. They couldn’t go anywhere, theirs was going to be a quarantine love story, or so she thought.

Their first day together was filled with promises of things they would do; paint the bedroom, hang the new curtains, whitewash the brick fireplace, the list went on and the optimism was aplenty.

By day three, they had crossed some smaller jobs off their very long list and were still in the throws of happiness, each laughing at the other’s jokes, sharing a knowing smile, reminiscing days when they could freely wander without risk of disease.

They steadily went through their list and with each passing day, their somewhat run-down house began to look fresh again.

Their relationship however was not going in the same direction. They had started to quibble over little things. Most of their days were spent disgruntled with each other. She was bored with him. Bored with seeing his face day in and day out! What she thought was indifference had now taken a different turn; She had begun to dislike him, even hate him! He always thought he new more than her. His ideas were better. His needs more important, his taste of a different caliber to hers. He was pretending to try to make her happy, but she knew he pitied her; Thought he was better. Day after day it went on, the belittling, the pretension, she couldn’t take any more! She screamed and screamed, but he wouldn’t bite, always calm, once again beating her in this war!

As she sat on their bedroom floor, staring at their wedding photo, wondering if she would ever be happy again, he came into the room, his eyes cloudy, his face feverish. He was pale. She didn’t care. She cursed him for pretending to be sick. She told him she had to get out of the house, that he was bringing her nothing but torment every day! He told her he loved her and he was sorry. He never meant for this to happen. She packed her bag, not even looking behind as she closed the door.

She drove for hours, not knowing where to go or who to see. Social distancing was a real thing, she had no one upon whom she could turn. She parked her car on the side of deserted road and cried herself to sleep. Finally, as the sun rose on a new morning, she opened her bloodshot eyes and realized what a fool she had been. It was not he who had caused so much harm to their relationship, it was she! How could I not see the destruction I had caused? Always looking for something better, for reasons why we wouldn’t work, why he wasn’t good enough! Why I wasn’t good enough! She drove to their small, quaint house, the newly hung curtains reflecting the sun’s morning glow. New beginnings were everywhere, including in her heart, she only hoped he would, no he could, forgive her. As she walked through the door, a smile came across her face, a true smile, a smile filled with love and hope. She ran to the bedroom door, yelling her apologies as she made her way. “I love you! Oh what a fool I’ve been!”

Her expression froze as she saw him. Her happiness turned to terror as she realized she would never again see his handsome face smile at her. Gone was the opportunity to rekindle anything. His blank gaze stared into the unknown beyond. His body no longer feverish. Her world, the world she thought so mundane, so horrific, gone. The man that until this morning, she had taken for granted, had never truly appreciated, but had always loved, he was gone, forever.

Give us Parents a Break Please!

One of my three children working hard at her new normal

Right now, our world as we knew it, has been completely turned upside down! There’s a pandemic out there that is scaring the bejesus out of us all! Our first responders (medical personnel, firefighters, police officers) are fighting with everything they’ve got whilst facing an extreme and before unheard of, lack of essential safety equipment. Times are tough. People have lost their jobs, unemployment is rising every day, social distancing is real and becoming tougher every day. We are all feeling pressures on us we never knew we would face! Parents are homeschooling and working from home, trying to balance this new normal as best they can, yet the minute they complain about it, others are very quickly putting them down and this really bothers me! I’m reading all of these Facebook stories/quotes/heartbreak moments that are trying to both scare parents with horror stories of children dying alone and to make parents feel bad for getting frustrated with their children after being stuck at home with them day in and day out!

Here’s the deal: don’t try to make me or any other parent for that matter, feel bad because I/we need to frigging vent! We know people have got it tougher than us! At no point in time have we said “woe is me!” or “I am in the worst position ever!” What we’ve said, had you been listening, is “holy shit!” – I really appreciate teachers right now! I really appreciate going to work, I really appreciate those few minutes I have to myself daily, I really love my kids but 24/7 is too much sometimes and I just need to vent without being judged and made to feel like the weight of the earth should rest on my already very weary, very overworked, overwhelmed, completely out of my comfort zone, feeling sorry for everyone in the entire earth including myself, shoulders! Stop it! Stop making us feel guilty for venting! We are doing the right thing, we are staying home, we are trying to be the best people we can be right now, but sometimes we get shitty, sometimes we want to scream out loud that we don’t want to anymore! Don’t throw shit in our faces about our babies dying! Don’t try to make us feel worse! We are in this position because we love our children so much that we are already feeling guilty we aren’t doing a good enough job at being parent, teacher, comforter, friend (because they can’t see any of their friends right now) 24hr guardian and everything else in between! Please just stop! Your tactics aren’t working to make this world a better place, they are simply making the good people out there; the people who are literally trying to be all things to the little people, feel even more like shit!

Let’s lift each other up, not put each other down! Let’s realize everyone needs to vent and for the most part, we are all trying to do the right thing and support our doctors and nurses, our medical technicians, our paramedics, our firefighters, our police, our military, our shop assistants, our shelf packers, our truck drivers, our construction workers, our funeral home workers, our delivery drivers, our scientists and researchers and laboratory technicians working day in and day out to find a vaccine, even a cure, our teachers who are still trying to figure out their new normal and how to best help their students, whilst juggling their own new normal, our restaurant chefs/cooks, kitchen hands and assistants, who are still making us food, but delivering it now, and all those who continue to work to help us get through this very difficult, crazy time.

DIY Halloween props

With Halloween only days away, I thought I’d share with you some of the things I’ve made for this year’s Halloween party! Notice I didn’t say just say “Halloween” that’s because in my house, it’s become more about the party than it has the actual night! Sorry kids! 🤣

Anyway, this year is going to be a blast and I wanted to share with you some fun, cheap DIY projects that you too can do at home with some pretty basic supplies!

1. Dollar store hanging pen

This one was really cheap and really easy to make, you could honestly stick anything inside it too, I just wanted something fun and easy to hang near the street, so opted for what a I’ve got.

What you’ll need: 2 baskets from the dollar store (sorry Aussies, you’ll have to pick some up from one of the cheap shops, I know they’re not a dollar, but still pretty reasonable). I spray painted them black with spray paint I already had but you can pick up cheap spray paint from Walmart or even your local hardware store.

I bought 2 stake (as in you normally stake them in to the ground) glow-in-the-dark arms from Dollar Tree as well as one of their skulls. I bought a mop also from there. I had an empty lacquer thinner container that I used as my ‘body’ (after I had rinsed it, of course) and got one of my son’s old shirts.

Get your dollar store mop and remove some of the strands:

I got a glue gun and took the strands from the mop and glued them to my skull. Nothing fancy, just gluing wherever they looked good. Then it’s a matter of putting it all together, I’ve seen similar projects with skeletons inside the baskets or even homemade ‘monsters’, as I said I opted for something super simple. The process was very easy and maybe took all of 20 mins (excluding drying time).

I grabbed the lacquer thinner container and drilled a hole on each side for the arms to slit into and put a dab of hot glue to hold them in place. I also hot glued the skull on to where the lid formally lived. Then it was just a matter of putting the shirt on and placing him in the basket.

After the baskets were dry (having sprayed both inside and outside of each) I placed my ‘half-guy’ into the basket and put the other one on top. I placed the hands where a I wanted them to go and zip tied everything in place. Then it was a matter of putting a couple of Dollar Tree rats on the outside of the cage and a chain from there also and zip tying those into place too. It has been outside in all sorts of weather and still looks great!

2. Dollar store trophies

I wanted to give out trophies this year as well as the prizes we regularly give out, but didn’t want to spend a fortune on them so I grabbed these from Dollar Tree:

and made them into these:

Super easy too! All you do is give the skull a light sanding and using acrylic paint, darken the already darkened areas on the skull. Grab a light grey paint (or gold/brown or whatever colour you like) then go over everything else, leaving the darkened spots in place to contrast. The great thing is that if you make a mistake, you can easily go back over it with whatever paint you need to!

Then I got a candle (also from Dollar Tree) that fitted into the top of the trophy perfectly. I hot glued this in place (just the lids so that if someone wants to use the candle they still can). Some of the candles I painted in a metallic acrylic paint, others I left as is. I printed out trophy names on the printer, cut them out and modpodged them to the candle cases. I glued hair on some and not on others, there’s even one as a gag trophy to a friend of ours because he promised to finally wear a costume to this year’s party! 😆

Let me know what you think. And if you try this yourself, I’d love to see your photos!

If you enjoy reading my crazy, varied blogs, please subscribe here on WordPress. Sharing is caring, so feel free to share with your friends. I’m on Facebook: Aussie Mum’s Adventures. Come like my page and share it with your friends! You can find me on Twitter: @ozmumsadventures, on Instagram: Ozmumsadventures, and on Pinterest: Aussiemumsadventures

Dollar Store Spring Planter Boxes

My house needed some pizazz! It was just looking a little too bare and dull and I wasn’t prepared to do anything with the brick work. As with everything, there’s a budget too and my budget wasn’t very big. So, how to make an impact on a small budget and spruce up the front of my house? Planter boxes! But, it wasn’t going to be practical for me to water real plants on a daily basis and I certainly didn’t want to have to change out the plants because of the seasons. I wanted some colour and I wanted to be able to change the colours whenever I felt the need. The answer: artificial flowers. Not normally my number one choice, but perfect for what I needed to do and the fact that I can buy them at the dollar store, made them an even better option and I can easily add more colours for each season.

IMG_2953.JPG

First step, buy some planter boxes. I happened to get mine from Lowes, they were about $7 a piece but they are good quality planter boxes and will last (a year later and they are still in great condition). Make sure you drill some drainage holes into your planter before you do anything else. Even though you are using artficial flowers, your planter is outside and needs to be able to get rid of water should you get rain. Also work out how you are going to attach the boxes to your window sills. I measured where I wanted my planter boxes to go then drilled holes in each of my planter boxes where the screws would go. I then used 3/4 inch long masonry screws and got my husband (I could have easily done it myself 😜) to drill holes in the brickwork (you will also need a masonry drill bit the same size as your screws). I know there are other options if you cannot drill into your house or if you don’t want to permanently attach the boxes, just ask someone at your local hardware store to show you alternative ways to showcase planter boxes.

IMG_7918 2.JPG

Screenshot 2019-04-04 11.53.32.png
Masonry screw

Obviously, you are going to need several bunches of artificial flowers and something to put them into inside your planter box. I bought the floral foam also from the dollar store and used this as my base. Try to separate your flowers and your greenery (at the original time of purchase, I bought this greemnery but it hasn’t held up well over the year, so I actually interchanged for a different kind when I added some new flowers for Spring). Cut your stems as long as you possibly can using some wire cutters, then insert into the foam pieces, ensuring you try to keep the same number of flowers in each planter and spread them out evenly. You may even want to raise the foam up a little bit if the stems aren’t long enough to show above your planter box, you can either add a second foam piece on top or just put a layer of moss or even dirt under the foam (the only thing you do need to think about is that you don’t want your planters to be too heavy if you are attaching them using the masonry screws so the dirt may not work).

After you have arranged your flowers, you want to make sure they stay in place, so this is when you will need another layer to hold them down, I used moss that I raked up from my yard so it still had some dirt attached to it and was heavier than moss that you would buy from a store along with a few small rocks.

Then it’s time to attach your planter boxes and voila! A gorgeous spruce up to some boring areas that doesn’t require very much maintenance!

*Note: Every season, I have added to my flowers with some different colours. It’s probably time to throw some of the original roses out as they have really faded (Our house faces East so gets the rising sun) but I haven’t worried about that just yet because the addition of the yellow, white and orange flowers and the other greenery, has spruced it up when you are looking at it from afar.

If you enjoy reading my crazy, varied blogs, please subscribe here on WordPress. Sharing is caring, so feel free to share with your friends. I’m on Facebook: Aussie Mum’s Adventures. Come like my page and share it with your friends! You can find me on Twitter: @ozmumsadventures, on Instagram: Ozmumsadventures, and on Pinterest: Aussiemumsadventures

Living with a ‘tweenage’ girl – belle fille intelligente

Note: This was originally written in 2016, updated April 2nd, 2019.

Today I have been reflecting on being a female in this world. There have been so many books, blogs, articles, you name it, written about young girls and how to give them the strength to face society as the best women they can be, but it is tough as a parent, to watch your child struggle with social situations in her ‘tweenage’ years.
My eldest daughter is 11 going on 12 this year (2016). She is incredibly smart, in fact, one of her teachers (a professor) just told me that he thinks she is incredibly gifted and wishes there was a formal gifted program at their school. Instead, he has started a high-level reading program with 5 students (our daughter included) that meets once a week during their lunch break to read and discuss whatever current book they have selected. It works well for our DD as reading is her strongpoint. It was always mine too. Forget Mathematics, give me a book any day, although she is mathematically minded as well.

Although eldest DD is very gifted when it comes to reading, she is lacking in some social skills and I’m not sure how to help her. She desperately wants to be popular but for some reason, isn’t well liked. Neither of us encourage her to seek popularity, rather to make a couple of well-trusted friends, but she just wants to be liked anyway. We try to understand what it is about her that other kids her age don’t take to, but we just don’t know. She is highly liked by adults/teachers and her own siblings adore her, particularly little sister. But what is it that she does, or how is she behaving when we are not in view, that is making her peers not take to her? She brought home a note last Friday that really upset me. It was from another student saying how much everyone dislikes her because she has a smart mouth. We tried to find out more about what this meant, but I truly don’t think she herself knows or is aware of, what she is doing. How does one rectify this? How can I help my daughter better socialize at school? She is always very polite and sweet. She can be bossy, yes, but swears she isn’t at school. She used to be a leader but now she is more of a follower because she so desperately wants others to like her that she has given up on the things she wants to do/play at school, doing seemingly, only what others want. I really worry. All this on top of being a girl in a society that is slowly improving, but still judges girls by their looks, their weight, their smile.

She hates her smile too. She needs braces and now with the whole dentist fiasco (was supposed to get them in Korea but didn’t because it wasn’t a very good deal) will have to wait some more. How can I instill in my beautiful girl all the wonderful things about her when she is already judging herself so harshly? Wondering what she does wrong that makes people dislike her? Hating her smile? The great thing about her though, she is full of confidence on so many other levels. How can I put this so you can understand? She believes in her sporting prowess and believes she is good at so many sports (some are hit and miss, but you know, who am I to judge). Though I do prefer she hear some truths from me rather than teammates.

IMG_9916
Photo Credit: Positive Energy

Then there’s her height. Most girls her age are taller than her. She is starting to feel it too, with kids teasing her at school about how she’s not growing. Sometimes I just want to punch all of these unthinking, inconsiderate, little so and so’s! We talk about teasing all the time in our family and our motto is: ‘Only give what you can take; Nothing mean, all in good fun’. But these kids are definitely not practicing that. Some of the stuff they say is just plain mean. DD tries not to let it get to her, but it does. She keeps asking me how she can grow taller. I’m always going to use that sort of a question as a chance to motivate more fruit and vegetables being eaten, but I don’t have the growth secret. Now, I’ve just started saying to her that it will happen in good time and when it’s meant to. Everyone grows and matures at different rates and she may well change at a later stage than most of her peers. My Mum keeps asking me too if she’s grown, knowing how big her other granddaughter is. I’ve finally told her not to ask anymore. I know she doesn’t mean it in a bad way, but DD is getting a big enough complex about it as it is, so all talk about her hitting her growth spurt has been banned at this point in time.

Screenshot 2019-04-02 12.21.48

Girls. They have it tough. We have it tough. Then she talks to me about perhaps going on a diet. What? No, I don’t think so. Her body is slowly changing as she becomes a woman and that means certain areas are expanding (and no, I dont necessarily mean breasts) and she isn’t comfortable with it yet, but that’s what happens to most girls (and some boys). The only thing I say to my children about dieting is “Every thing in moderation.” You can eat anything you like as long as you eat it in a balanced way, is my point of view. That means limit the stuff you know is bad for you, ensure you get lots of good, hearty fruits and vegetables on a daily basis and don’t keep eating just for the sake of eating (exactly what we did on the cruise and over Christmas which is what started me needing to go on an exercise regimen in the first place). Also make sure you get plenty of exercise on a daily basis. My girls ride their bikes almost daily. They walk to and from the bus stop. They walk our dog. We try to be a fairly active family. I’m not concerned about the exercise part, but my dear daughter does like her junk food and won’t eat any fruit except apples, so she may have to start doing something else on top of our regular stuff. I suggested swimming but she told us that some of the girls who don’t like her are on the swim team. Back to that again.

I think my husband is just now starting to see all of the obstacles facing girls. Other girls are mean to girls, boys are mean to girls. Girls are expected to be both beautiful and smart, yet the minute we make a mistake it’s ‘because we’re a girl’ or because we’re not smart.

IMG_9860
Photo Credit: Momma Unfiltered

It’s time we changed this kind of thinking for once and all. No more putting crap on other girls. It is our duty as mothers (aka females) to ensure our girls are not mean to other girls. It is ok to be competitive, but when you start putting someone else down to lift yourself up, something has gone wrong. We should be greeting each other daily with a pat on the back and a compliment. That’s something else I’ve learnt from my other daughter (from the moment she started talking until this day); give compliments. Try to find something, anything, about someone you are talking to and compliment them on it. “Your hair looks amazing today!” “I like your scarf.” “Those are beautiful (insert anything here, earrings, sandals, etc).” It doesn’t have to be super personal, but it does have to be sincere. This gossiping crap has to stop too.

There’s an old saying we are all familiar with, ‘If you can’t say something nice, don’t say anything at all.’ It’s true. Just don’t speak. Obviously there’s also some grey here, if something has been done to wrong you, then tell your story, but don’t put that other person down in the telling, otherwise you’re stooping to the same level, meaning you are no better than them. Even when eldest DD talks to me about someone at school, she never puts them down, she will say something very simply like, “…… was really mean to me today. She called me short and said I was a B word.” (She’s not allowed to say it but will let me know if someone has said it to her by stating the term ‘B’ word). Now this was but an example, but I like the fact that in the real life scenarios there isn’t any name calling coming from my own daughter. My girls rarely put other people down. It makes me very proud! I encourage you to ensure your daughters don’t either (and sons for that matter).

We must pick each other up rather than put each other down. We must encourage healthy eating rather than junk (which we are doing, but we still have a long way to go), we must encourage the realistic body not the photoshopped image, (again, we are doing just that) but we must also encourage the realistic body that is doing regular exercise rather than the overweight body that is doing none.

Our daughters need to hear from us every single day just how beautiful they are, just how smart they are. Unfortunately certain web sites, some famous people, authors and journalists and bloggers and whomever else, that talk about the unimportance of beauty have got it wrong. Yes, I said beauty is not unimportant. But before you get on your high horse and start accusing me of being shallow and all sorts of other things, please hear me out:

We are made (human nature) to admire beautiful things (whether that be in nature, or in another human being). There is such a thing as inner beauty, yes, but there is also such a thing as outer beauty and it will always be recognized. Our daughters should be recognizing their own beauty both inside and out. I read an article the other day about how you shouldn’t be encouraging your daughters to care about the way they look and I have to say, I completely disagree. You should take pride in your appearance, you should encourage your children to take pride in their appearance. You should love yourself both inside and out. We all look in the mirror and we all see flaws no one else sees, but we have to be able to see beauty there too. There will always be someone more beautiful, smarter, with a better body. We need to be aware that that will always be the case, but it’s ok, because we are confident in our own selves and our abilities and our beauty, both inner and outer. We know that a smile is truly beautiful (yes, even the smile thought to be a flaw by the owner), we know that happy girls are confident girls and vice versa and confident girls are beautiful girls. Our daughters are always going to see people being recognized for their beauty. It does exist and it is very real and there are truly beautiful people surrounding us. It’s part of life. We need to focus more on the confidence part. We need to focus on all the positive things in our girls. We need to help them to help both themselves and to help others. We need to make sure they are lifting others up.

How do we do this? Well this is where we as women must lift each other up too. I challenge you to give everyone you meet tomorrow a compliment. I challenge you to find things that will inspire your daughters to be the most beautiful people they can be by bringing others up. Lead by example. Don’t gossip, don’t bitch and moan, always talk positively about your friends and their strengths and always remind your daughters to be the best “insert name here” they can be. I also went into my daughter’s room whilst she was at school today and put inspirational quotes, and reassurances everywhere. Including some I thought pertinent to just her at this time. And there are quite a few for when she’s laying in bed looking at her ceiling:


Just in case she needs reminding when no one is about. 😊

Boys will not judge my daughter and place her into a category and girls will not bring her down. She shall know each and every day just how special and amazing she is. And how beautiful she is on the inside and out. She will know how talented she is when it comes to singing and playing her guitar and she shall know that she has very special strengths and is truly gifted when it comes to reading and comprehension. We will be realistic with her when she asks our advice but we will never shame her choices. I challenge you to make sure your daughter knows those same things; as relevant to her and her own strengths. Your sons too.

*Update: 3 years later.

My eldest daughter is now incredibly confident and not invloved in any drama with any girls. She knows her own strengths, she works hard and she is surrounded by a great group of friends. She has started playing lacrosse (absolutely loves it) and is still an avid reader. She has truly come a long way from this moment in time. I hear her talking to her friends sometimes and I never hear her putting anyone else down, which makes me incredibly proud. In fact, knowing all of this has given me the strength to get through it with my now 10 going on 11-year-old daughter who seems to be going through an almost identical situation on a daily basis. A friend of mine asked me for advice the other day because she too is experiencing something similar. I told her to reassure her daughter. Tell her she’s there for her. Listen, but try not to let her see how angry you are at those other kids, that ‘mama bear’ doesn’t necessarily help in these moments. Don’t get involved directly with the drama either, that just prolongs it (trust me, I’ve learned from experience). But most of all, remember the 3 R’s: Reassure, Remind, Renew. Reassure her daily of all her strengths, all that she has both inside and out. Remind her to help others up rather than put them down. Renew her confidence in herself and love, love with all your heart.

If you enjoy reading my crazy, varied blogs, please subscribe here on WordPress. Sharing is caring, so feel free to share with your friends. I’m on Facebook: Aussie Mum’s Adventures. Come like my page and share it with your friends! You can find me on Twitter: @ozmumsadventures, on Instagram: Ozmumsadventures and on Pinterest: Aussiemumsadventures.

Hearty Beef Bourguignon

As with so many of my blogs, they really are random and varied in their subject topics and this one is no exception.

Several years ago, a wonderful friend of mine who was born in Paris but raised in the French countryside by her Parisian mother and Tunisian father, showed me how to make beef bourguignon. It was one of the most wonderful meals I’ve tasted. Over the years, I have made a few adjustments and even modified it for the crockpot and it has become a favourite meal in our house. According to my French friend, the difference between French country beef bourguignon and Paris beef bourguignon, is the potatoes, but I love them and wouldn’t make it without them as they give this dish the added heartiness it needs.

I’m going to do my best to share with you the recipe/process of making it but you must first understand that I don’t really measure anything when I cook, so you’ll have to go with my explanation of amounts and if your anal about your quantities, you’ll just have to make it your own by perfecting the measurements 😉. The great thing for me is that each time I make beef bourguignon, it has an ever so slightly different taste and each time is just as lovely as the prior one.

If you’re still here then I’m assuming you want to know more. This is a great family meal and can also be a great dinner party meal, which is how I came to writing this blog. We had guests over one Friday night and the menu was quite last minute, but it was a hit and I was asked to share my recipe, so here goes:

Obviously the first thing you need is the beef. I am not completely au fait with different types of beef, so I normally buy either a nice looking lean beef for stewing package (and still remove all of the fat as none of my family likes fat on any meats) or I buy a top sirloin family package and cut it into chunks (somewhere about the 5cm/2” chunk size especially if I’m doing it in the crockpot as the meat will shrink, basically, you want it to be bite size after it has been cooking. As far as the amount of meat, it really depends on how many you’re cooking for. The night of the dinner party, I was cooking for 8, so I used about 1kg/just over 2lbs, of meat.

I cook the meat in a large pan with olive oil on a medium high heat until just brown, then add the bacon. Again, I like the bacon to be nice and lean. I cut most of the fat off and have even used lean turkey bacon in the past. Either one works. In this case I used 7-8 slices of center cut pork bacon that I cut into very small pieces after I had trimmed the fat off. Then I threw in a variety of salts (pictured) because I didn’t have any ‘seasoned salt’ on hand, so just made my own. It’s important to add a little extra salt as you will be cooking potatoes.

I added 3 cloves of fresh garlic (refrigerated minced garlic is just as good – about 3 teaspoons) and lots of onion powder as well as some dried minced onion (note – I love cooked onion but my husband and 2 of my kids, do not. I find things need that onion-y taste, so have resolved to using a mix of onion powder/dried minced onion to give the taste without adding the texture they dislike so much).

This is a 1/4 cup that I used as an oversized spoon equivalent- don’t get too caught up on perfect measurements 😊

Next add a couple of heaped tablespoons (or 1/4 cups with a bit) of flour. This was weird for me the first time I saw it as I thought it would end up chunky/lumpy like gravy, but it works itself out. Stir the flour in, it will get thick and pasty very quickly so have your wine ready to go.

Thick and pasty after the flour has been added


I really like using the box wine for this. I have used different types of red and I guess it can’t really be called a bourguignon if you don’t use that wine, but semantics. Lol. The Franzia chillable red gives the dish a lighter taste (which my kids prefer, rather than a heartier red that continues to give it a ‘wine’ taste even after the alcohol is cooked). My friend used a heartier wine but added an equivalent amount of water, so I really find this does the job just as well. I did measure it this time knowing I would share the recipe with you 😊 and I used about 750mls of the Franzia and added  about 250mls of a cheap cab sav to find a happy medium in the sauce/stew. I gave it a quick stir and threw it all into the crockpot then added the tomatoes and tomato paste, 3 bay leaves and a huge spoonful of the beef stock paste you see pictured here. I love this paste. Best stock brand in America in my humble opinion. Find a good quality beef stock where you live and use it generously.

If you are cooking it in your pan, add these ingredients, put a lid on your pan and turn it down to a simmer, stirring regularly and cooking for about 40 mins. If you’re using a crockpot, set on low for 8 hours or on high for 3-4 hours, stirring it after about an hour.

Potatoes. In this particular meal, I used a 3lb bag of baby red and yellow potatoes. But I’ve used all sorts of potatoes and just cut them into bite sized pieces. You have some different options here as far as cooking them goes too. I like to cook the potatoes a little bit before adding them to the crockpot as I have had potatoes not quite cooked even after they have supposedly simmered away for 8 hours. Your other option is to cook them and add them at the last minute. I prefer the first method because they get the saucy flavour interspersed in the potato and it adds to the overall quality of this dish, but sometimes things don’t work out, so it’s always an option at the end. If you’re cooking this meal on the stovetop, then your only option is to cook the potatoes separately and add them into the sauce for a few mins. Make sure you taste it after you have added the potatoes to see if you need to add some extra salt, this goes for both methods.

To finish off this hearty stew meal, I throw a loaf (or two) of French bread into some foil and warm it up in the oven. Serve it with some real butter and let your guests dip away into this wonderfully warming meal!

Let me know what you think of this recipe and if you make it, how it goes down with your family and friends. This meal gave 4 of us seconds and lunch for 4 of us the following day, so it certainly went a long way.

If you enjoy reading my crazy, varied blogs, please subscribe here on WordPress. Sharing is caring, so feel free to share with your friends. I’m on Facebook: Aussie Mum’s Adventures. Come like my page and share it with your friends! You can find me on Twitter: @ozmumsadventures, on Instagram: Ozmumsadventures, on Pinterest: Aussiemumsadventures And please subscribe to my YouTube channel: Aussie Mum’s Adventures – it’s a work in progress though 😊

Ingredients

  • Beef
  • Bacon
  • Seasoned salt
  • Garlic
  • Onion
  • Wine
  • All purpose (USA) or plain flour (Australia)
  • Large can of crushed tomatoes (28oz in USA equivalent to 794grams metric – but don’t worry about being precise, just adjust your other ingredients to account for amount of tomatoes) and/or
  • Fresh tomatoes if desired
  • Tomato paste – small can or about 2 heaped tablespoons – be generous 😊
  • Bay leaves
  • Beef stock
  • Potatoes
  • Crusty bread